Contember Interface
Contember Interface is a React-based framework designed to rapidly develop custom user interfaces. While the Contember Engine operates independently as a headless GraphQL API, integrating it with the Interface allows for swift creation of user interfaces tailored to those needing immediate data interaction.
In this guide, we'll demonstrate how to construct a UI for managing articles. The flexibility of Contember Interface means that you can incorporate any React components alongside the pre-built Interface components. This seamless integration facilitates data binding, simplifying the development process and enabling you to efficiently build a wide range of single-page applications (SPAs).
Understanding the Contember Interface Core and Default UI
The core of the Contember Interface is a headless framework, meaning it operates without a predefined user interface. However, a newly created project is pre-equipped with a default UI that utilizes the popular shadcn/ui styled with Tailwind CSS. This default UI, built using the Contember Interface, serves as an excellent starting point for developing your custom UI.
Understanding Import Paths
When working with Contember, it's important to understand the source of your imports:
- Interface Core Imports: Any import from
@contember/*packages pertains to the headless core. These imports are part of the framework's core functionality that does not impose any UI constraints. - Default UI Imports: Imports from
@app/lib/*are associated with the default UI found in theadmin/libdirectory. This is where you'll find pre-configured components and utilities styled with Tailwind CSS and ready to use or customize in your project.
Opening the UI
Once you launch the Contember App by navigating to http://localhost/, you'll be greeted with the login screen. This entry point is fully customizable to fit your project's requirements.
Development Environment Access
In a development environment, you have the convenience of bypassing the standard login process. Simply click the "Continue as default user" button, which will automatically redirect you to the /app route, granting immediate access to the application.
Building the UI
Before we start, make sure you already have a Contember project running on your computer. This should be a project with your data model that we made in the designing your model guide.
Exploring page routing
The naming of pages (and by extension, URL paths) is automated. The name given to a page is determined by the name of the file and the function, with slashes ('/') used as separators.
To explore the routing and page creation capabilities in Contember, follow these steps to create a basic example page:
- Navigate to the
admin/app/pagesdirectory within your project. - Create a new file named
example.tsx. Each function exported from this file will automatically be routed and can be accessed via a specific URL.
Here's a simple example to illustrate how to export a function and view it in the browser:
export const ExamplePage = () => {
  return <h1 className="text-lg">This is an Example Page</h1>
}- To view this function as a webpage, navigate to http://localhost:1480/app/example/example-page. This URL will display the message "This is an Example Page," styled using Tailwind CSS, as defined in your component.
- If everything is working correctly, you can delete the
example.tsxfile and proceed to create more complex pages.
You can also export JSX elements directly from the file. This approach is useful for creating simple pages without the need for a function wrapper.
List all articles
Now, let's create a page that lists all articles in our project.
To do this, we'll create a new file named article.tsx in the admin/app/pages directory. This file will contain a simple table listing all articles in our project.
import { Title } from "@app/lib/layout";
import { Binding } from "@app/lib/binding";
import { DataGrid, DataGridLoader, DataGridPagination, DataGridTable, DataGridTextColumn, DataGridToolbar, } from "@app/lib/datagrid";

export const list = () => (
  <>
    <Title>Articles</Title>
    <Binding>
      <DataGrid entities="Article">
        <DataGridToolbar />
        <DataGridLoader>
          <DataGridTable>
            <DataGridTextColumn field="title" header="Title" />
          </DataGridTable>
        </DataGridLoader>
        <DataGridPagination />
      </DataGrid>
    </Binding>
  </>
);
What we've created here is a page that renders a table listing all the articles in our project. The table includes a column for the title of each article. Let's break down the key components:
- Imports: We start by importing necessary components from
@app/lib/layoutfor layout configuration, and from@app/lib/datagridfor displaying data in a grid format. - Title Component: This component sets the title of our page to "Articles". It uses slots to display the title in the correct location.
- Binding Component: The component initializes Data Binding for the page. It is essential for fetching and displaying data from the Contember Engine.
- DataGrid Component: Here we define the main container for our data grid. We specify "Article" as the entity type that this grid will display, which should match the entity defined in your model.
- DataGridToolbar and Pagination: These components add a toolbar and pagination functionality to our data grid, enhancing user interaction.
- DataGridLoader and Table: The
DataGridLoadercomponent handles the loading of data, andDataGridTableorganizes this data into a tabular format. TheDataGridTextColumnspecifies that we want to display the "title" field of our articles.
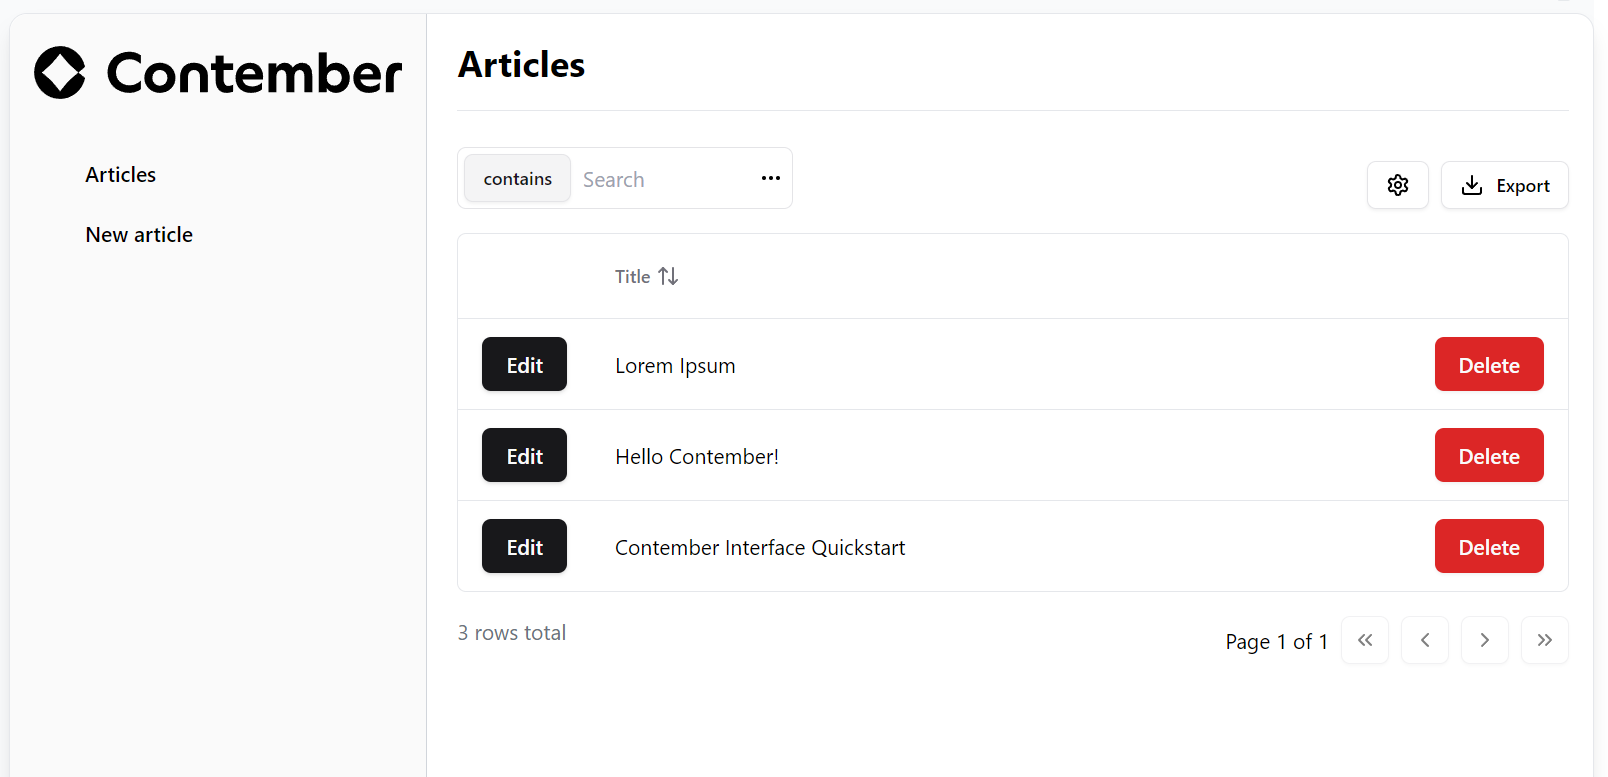
When you navigate to http://localhost/app/article/list, you should now see a list of your articles. Keep in mind, this list will be empty if no articles have been added to the data model yet. Here's a revised version of your documentation for creating an article, properly formatted in Markdown and adjusted to improve clarity:
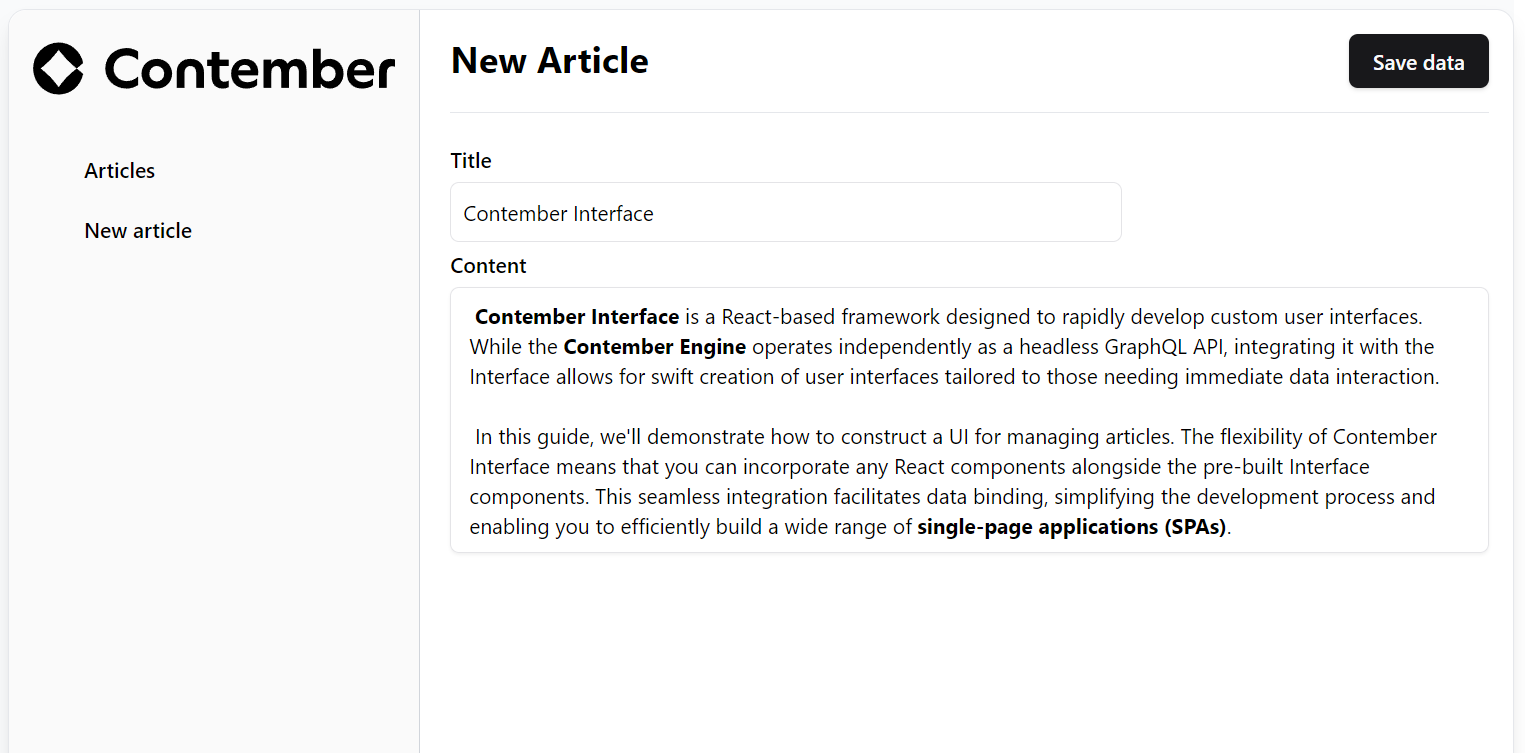
Create an Article
Now we're moving on to creating an article. You have the option to create multiple files for each page, or you can consolidate multiple functions in a single file. In this example, we'll add the creation functionality to the same file as the listing.
// previous imports
//...
// new imports
import { PersistButton } from "@app/lib/binding";
import { EntitySubTree, RedirectOnPersist } from "@contember/interface";
import { Slots } from "@app/lib/layout";
import { InputField } from "@app/lib/form";
import { RichTextField } from "@app/lib/editor";

// previous list function
// ...

export const create = () => (
  <>
    <Title>New Article</Title>
    <Binding>
      <Slots.Actions>
        <PersistButton />
      </Slots.Actions>
      <EntitySubTree entity="Article" isCreating>
        <RedirectOnPersist to="article/list" />
        <InputField field="title" label="Title" />
        <RichTextField field="content" label="Content" />
      </EntitySubTree>
    </Binding>
  </>
)
Here's a breakdown of the process:
- File Structure: We continue using the same file,
article.tsx, located in theadmin/app/pagesdirectory. This approach keeps related functionalities together. - Components for Creating an Article:
- PersistButton: Allows users to save the new article.
- EntitySubTree: Sets up a new entry creation for the specified entity, in this case, "Article".
- RedirectOnPersist: Redirects to the article list view upon successful creation.
- InputField and RichTextField: These are used for entering the title and content of the article. They bind directly to the corresponding fields in the Article entity.
By navigating to http://localhost/app/article/create, you can create a new article. After creation, if you return to the list of articles, your new article will appear there.
Edit an Article
Editing an article in Contember is similar to the creation process, with some adjustments to cater to the specifics of editing an existing entity. In this example, we will also use the same file, article.tsx, to maintain consistency and consolidate related functionalities.
// previous imports remain the same
//...

// previous list and create functions
// ...

export const edit = ({ id }) => (
  <>
    <Title>Edit Article</Title>
    <Binding>
      <Slots.Actions>
        <PersistButton />
      </Slots.Actions>
      <EntitySubTree entity={`Article(id=$id)`}>
        <RedirectOnPersist to="article/list" />
        <InputField field="title" label="Title" />
        <RichTextField field="content" label="Content" />
      </EntitySubTree>
    </Binding>
  </>
)- File Structure: We are still working within
article.tsxlocated in theadmin/app/pagesdirectory. This file now contains the list, create, and edit functions. - EntitySubTree Component Adjustment:
- EntitySubTree: Unlike the creation page, the
EntitySubTreecomponent in the edit function is configured with anentityprop that includes an ID parameter (id). This ensures that the form is bound to a specific existing article, which is identified byidparameter. - ID Parameter: The
idis passed to theeditfunction from the URL's query, allowing the form to load the specific article's data for editing.
Adding an Edit Button to the DataGrid
To enhance the usability of our article list, we can add an "Edit" button within the DataGrid. This button will allow users to navigate directly to the edit page for each article. Below is the implementation using Contember's components.
// Additional imports
import { Link } from "@contember/react-routing";
import { AnchorButton } from "@app/lib/ui/button";
import { DataGridActionColumn } from "@app/lib/datagrid";

// inside the DataGrid component, before "DataGridTextColumn"
<DataGridActionColumn>
  <Link to={`article/edit(id: $entity.id)`}>
    <AnchorButton>Edit</AnchorButton>
  </Link>
</DataGridActionColumn>
Breakdown of the New Components:
- DataGridActionColumn: This component from
@app/lib/datagridis used to add action buttons like "Edit" within each row of the DataGrid. - Link Component: Imported from
@contember/react-routing, the Link component is a headless utility that generates a navigation URL. It uses thetoprop to dynamically create the href for theAnchorButton, passing the current article's ID to the edit page route. - AnchorButton: This button component from
@app/lib/ui/buttonacts as an anchor tag (a) but styled as a button. It receives the href from the Link component through a Radix slot, providing a seamless and styled navigation experience.
Here's how you could document the process of adding a "Delete" button to the DataGrid in your article.tsx file, which allows users to remove articles directly from the list view:
Adding a Delete Button to the DataGrid
Incorporating a "Delete" button into the DataGrid allows users to remove articles directly from the list. This section details how to implement this functionality using components from the Contember libraries.
// Make sure to import the necessary components
import { DataGridActionColumn } from "@app/lib/datagrid";
import { DeleteEntityDialog } from "@app/lib/binding";
import { Button } from "@app/lib/ui/button";

// Add the following within the DataGrid component
<DataGridActionColumn>
  <DeleteEntityDialog trigger={(
    <Button variant='destructive'>
      Delete
    </Button>
  )} />
</DataGridActionColumn>
Component Overview:
-
DataGridActionColumn: This component is part of
@app/lib/datagridand is used to introduce actionable items like buttons into each row of your DataGrid. -
DeleteEntityDialog: Sourced from
@app/lib/binding, this component handles the deletion process. It encapsulates the delete logic and UI in a dialog, which is activated by a trigger. -
Button Component: This button, coming from
@app/lib/ui/button, serves as the trigger for the DeleteEntityDialog. Set with a 'destructive' variant, it clearly indicates a deletion action, enhancing user interface intuitiveness and safety.
By adding this Delete button to each row in the DataGrid, users can easily and securely delete articles. The DeleteEntityDialog ensures that deletions are handled gracefully, offering prompts and confirmations to prevent accidental data loss.
Extracting article form
As the article form is used in multiple places, it's a good idea to extract it into a separate component. This way, you can reuse the form in the create and edit pages.
// add Component import
import { Component } from "@contember/interface";

// define the ArticleForm component outside of the page functions
const ArticleForm = Component(() => <>
  <InputField field="title" label="Title" />
  <RichTextField field="content" label="Content" />
</>)
Now you can use the ArticleForm component in the create and edit functions:
export const create = () => (<>
  <Title>New Article</Title>
  <Binding>
    <Slots.Actions>
    <PersistButton />
    </Slots.Actions>
    <EntitySubTree entity="Article" isCreating>
      <RedirectOnPersist to="article/list" />
      <ArticleForm />
    </EntitySubTree>
  </Binding>
</>)
Breakdown of the New Components:
- Component: This is a higher-order component (HOC) from
@contember/interfacethat ensures the component is properly integrated with the data binding system. It's essential for components that use data binding. - ArticleForm Component: This component encapsulates the form fields for creating and editing articles. By extracting the form into a separate component, you can reuse it across multiple pages, enhancing code reusability and maintainability.
Complete code for the article.tsx file
Here's the complete code for the article.tsx file, which includes the list, create, and edit functions, as well as the extracted ArticleForm component:
import { Slots, Title } from "@app/lib/layout";
import { Binding, DeleteEntityDialog, PersistButton } from "@app/lib/binding";
import {
  DataGrid,
  DataGridActionColumn,
  DataGridLoader,
  DataGridPagination,
  DataGridTable,
  DataGridTextColumn,
  DataGridToolbar,
} from "@app/lib/datagrid";
import { Component, EntitySubTree, RedirectOnPersist } from "@contember/interface";
import { InputField } from "@app/lib/form";
import { RichTextField } from "@app/lib/editor";
import { Link } from "@contember/react-routing";
import { AnchorButton, Button } from "@app/lib/ui/button";

export const list = () => (
  <>
    <Title>Articles</Title>
    <Binding>
      <DataGrid entities="Article">
        <DataGridToolbar />
        <DataGridLoader>
          <DataGridTable>
            <DataGridActionColumn>
              <Link to="article/edit(id: $entity.id)">
                <AnchorButton>Edit</AnchorButton>
              </Link>
            </DataGridActionColumn>
            <DataGridTextColumn field="title" header="Title" />
            <DataGridActionColumn>
              <DeleteEntityDialog trigger={(
                <Button variant='destructive'>
                  Delete
                </Button>
              )} />
            </DataGridActionColumn>
          </DataGridTable>
        </DataGridLoader>
        <DataGridPagination />
      </DataGrid>
    </Binding>
  </>
);

export const create = () => (
  <>
    <Title>New Article</Title>
    <Binding>
      <Slots.Actions>
        <PersistButton />
      </Slots.Actions>
      <EntitySubTree entity="Article" isCreating>
        <RedirectOnPersist to="article/list" />
        <ArticleForm />
      </EntitySubTree>
    </Binding>
  </>
)


export const edit = () => (
  <>
    <Title>Edit Article</Title>
    <Binding>
      <Slots.Actions>
        <PersistButton />
      </Slots.Actions>
      <EntitySubTree entity="Article(id=$id)">
        <RedirectOnPersist to="article/list" />
        <ArticleForm/>
      </EntitySubTree>
    </Binding>
  </>
)

const ArticleForm = Component(() => <>
  <InputField field="title" label="Title" />
  <RichTextField field="content" label="Content" />
</>)
Add pages to side menu
The final step is to add our pages to the sidebar navigation. This provides easy access to all of our pages:
import { Menu, MenuItem } from "@app/lib/ui/menu";

export const Navigation = () => (
  <Menu>
    <MenuItem to="article/list" label="Articles" />
    <MenuItem to="article/create" label="New article" />
  </Menu>
);